
A c-wire adapter for a smart thermostat solves the no-common-wire problem in four moves. Check your wiring for a spare wire, pick a kit made for your thermostat and heating system, connect the adapter at the furnace and at the thermostat, then test heating, cooling and fan.
How to Install a c-wire adapter for a smart thermostat
You do not open a wall or pull new cable. Most installs need only a screwdriver and a phone camera.
The problem shows up the moment you unbox a smart thermostat. The screen stays blank, or it runs for a day and then reboots, or the Wi-Fi keeps dropping. Old thermostats ran on a couple of wires and needed no constant power. A smart one does, and many older homes, including plenty of Chicago bungalows and two-flats wired for heat-only thermostats, have a cable with no common wire to supply it.
This guide covers what the common wire does, how to confirm you lack one, how to choose a compatible kit, how to install it, and how to fix the usual problems, plus what a technician checks and when to hand the job over.
Modern HVAC Tech is a Chicago HVAC company with more than twenty years in the trade, so the checks below are the ones that matter most before you touch a furnace board.
Why smart thermostats need a C wire
A smart thermostat needs a C wire because its screen and Wi-Fi radio draw power all the time. An adapter gives you that wire without new cable in the walls.
What the common wire does
Your furnace or air handler has a 24-volt transformer. The R wire carries power from it to the thermostat. The C wire, or common wire, completes the circuit back to the transformer, so the thermostat gets constant 24-volt power. A mechanical thermostat needed none of this. A smart thermostat that lacks a C wire may try to steal power through the heating or cooling wires, which can cause buzzing, short cycling or random restarts.
An adapter does not add a wire to your wall. It reuses wires you already have so one of them can act as the common.
When an adapter makes sense
You have three realistic options. If a spare wire is tucked in the cable, connect it as the C wire and skip the adapter. If there is no spare, use a c-wire adapter for your smart thermostat. If the cable has too few wires for any kit, run new cable, which is the most work. Most no-C-wire homes land in the middle option.
What it costs
Kits sell for roughly the price of a nice dinner. One retailer lists the Sensi kit at $27.99. Running new cable through finished walls usually costs far more in labor than a kit does. If you want a professional install, ask for the price in writing before the work starts.
Step 1. Check your wiring for a C wire
Before you buy anything, confirm that you really have no usable C wire, and that your system is low voltage.
Open the thermostat safely
Turn off power to the furnace at its switch and at the breaker. Pull the thermostat off its base, then photograph the wiring with every label visible. Tape a small flag onto each wire if the labels are loose.
Look for a spare wire and a C terminal
Check each end of the cable:
- At the thermostat, count the conductors. Note any wire that is tucked back and not connected.
- At the furnace, open the panel and find the control board. Look for a terminal marked C or COM.
- Check whether the spare wire is attached to that terminal at the board.
Blue is the usual color for a common wire, but colors are not guaranteed, so trust the terminal labels. If a spare wire exists and the board has a C terminal, connect the spare at both ends. No adapter needed.
Rule out systems an adapter cannot serve
Smart thermostats run on low-voltage systems only. If your thermostat controls electric baseboard heaters, or has thick wires marked 120 or 240 volts, stop here. An adapter is not the answer, and you need a thermostat designed for line voltage. A two-wire millivolt system is also a different animal, so confirm your system type before buying anything.
Step 2. Pick a compatible adapter kit
Choose a c-wire adapter for your thermostat that its maker supports and that matches the wires and equipment you found in Step 1.
Match the kit to your thermostat
Kits come from thermostat makers and from third parties. Resideo sells one for Honeywell Home thermostats, Copeland offers one for Sensi, and Meross sells its own adapter. A kit that fits one brand is not guaranteed to fit another, so look for one that lists your thermostat and system type by name rather than calling itself universal, and check the compatibility list in the thermostat's manual.

Match the kit to your system
Use this table with the notes from your photo.
| Your wiring situation | What to buy |
| Spare wire and a C terminal on the board | Nothing, connect the spare wire |
| Four or more wires with cooling (R, W, Y, G), no spare | An adapter kit from your thermostat maker |
| Two or three wires, heat only | A kit whose listing explicitly supports heat-only systems |
| Heat pump or multi-stage equipment | A kit that lists heat pump support, or new cable |
| Line voltage or millivolt | Not an adapter job |
Check the wire count
Many kits work by sharing one existing wire between two jobs, often the fan wire. That means your cable needs enough conductors for the kit. Compare the number of wires you counted with the minimum stated on the box before you pay.
Step 3. Install the adapter at the furnace and thermostat
Installing a c-wire adapter for a smart thermostat has two ends: the adapter at the furnace control board and the connections at the thermostat. Your kit's diagram is the authority for both.
Prepare and wire the furnace end
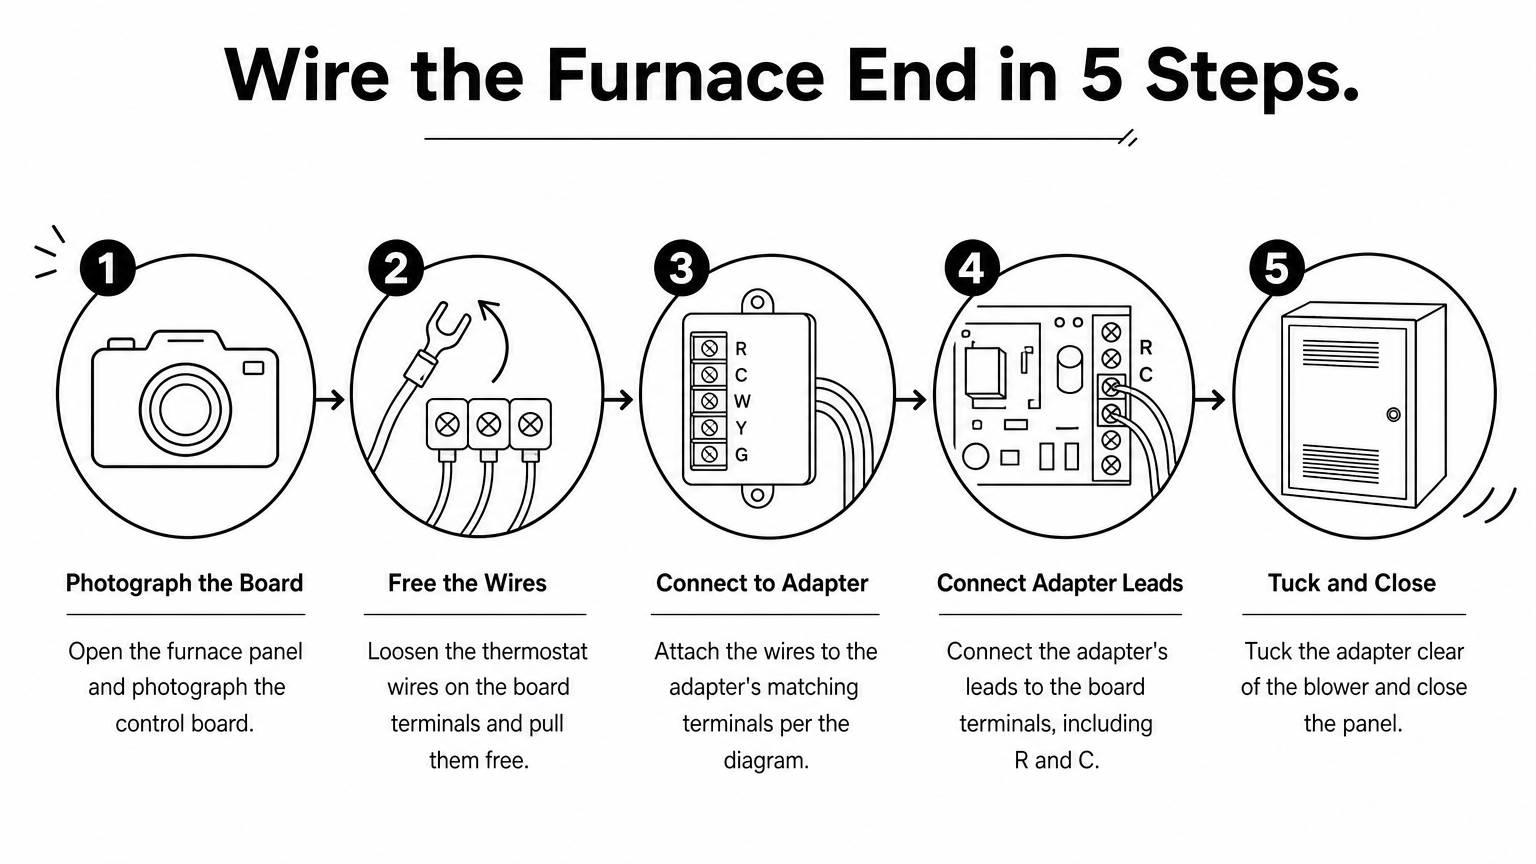
Keep the power off. You need a small screwdriver, wire stippers, your photos and the kit's instructions. Then follow this order:
- Open the furnace panel and photograph the control board again.
- Loosen the thermostat wires on the board terminals and pull them free.
- Connect those wires to the adapter's matching terminals, as the diagram shows.
- Connect the adapter's leads to the board terminals, including R and C.
- Tuck the adapter clear of the blower and close the panel.
Strip about a quarter inch of insulation. Make sure each wire is fully seated and cannot be tugged out.
Follow the diagram in your kit, because each adapter routes the fan and common wires differently.
Connect the thermostat end
Mount the new base and connect each wire to the same-lettered terminal, adding the C wire the diagram calls for. Give every wire a gentle tug. Attach the display, restore power at the breaker and the furnace switch, and let the thermostat start up.
Step 4. Test the system and fix common problems
Run every mode once. If something fails, the cause is almost always a wire in the wrong place.
Run a full test
Set the thermostat to heat and raise the target a few degrees. Confirm the furnace starts and warm air flows. Then switch to cool and confirm the outdoor unit and indoor fan start. Finally, run the fan alone. Watch the thermostat for a few minutes to make sure it does not reboot.
Troubleshoot what you see
| Symptom | Likely cause | Fix |
| Screen stays blank | Loose wire, C on the wrong terminal, or a blown low-voltage fuse | Recheck seating against the diagram. If the board's small fuse is blown, find the short and replace it with the same rating |
| Fan runs nonstop | Fan wire routed incorrectly through the adapter | Compare the G wire path to the diagram |
| Heat or cooling will not start | Y or W wire in the wrong terminal | Match each wire to your photo |
| Thermostat reboots or loses Wi-Fi | Weak C connection | Reseat the C wire at both ends |
A blank screen after installing a c-wire adapter for a smart thermostat points to a loose or misplaced wire far more often than a bad kit.
Know when to call a technician
Call a pro if the board shows scorch marks, the fuse blows again after replacement, or your system is a heat pump with no matching kit. A dead thermostat on a cold Chicago night is a bad time to experiment. Our Smart Thermostat Installation service has technicians handle the installation quickly and efficiently, and our team answers urgent calls around the clock.
What a technician checks that a DIY install can miss
Most smart thermostat installs go smoothly. The ones that stall usually hit something you cannot see from the wall plate. These are the checks a technician makes before closing the panel, and they explain a lot of stubborn blank screens.
| What a technician checks | What a DIY install tends to miss | Why it matters |
| Voltage between R and C | The screen lights up, so nobody measures it | A meter should read roughly 24 to 28 volts AC. A much lower number points to a weak transformer or a poor connection. |
| Transformer capacity | A smart thermostat plus a humidifier, zone panel or other accessory can ask for more than a small transformer supplies | Overload shows up as random reboots and dropped Wi-Fi that look like a faulty thermostat. |
| Condition of the old cable | Brittle insulation, nicked conductors and wire ends that were cut short years ago | A tested conductor gets reused; a failing one is the real reason a kit seems not to work. |
| Thermostat equipment settings | Skipping the setup menu for system type, heat pump or stages, and fan control | A wrong setting can run the wrong mode or leave the fan running when it should not. |
| Boilers and two-wire systems | Assuming every furnace-style kit fits | Many Chicago homes heat with a boiler. Some have no 24-volt transformer for the thermostat, and others use a separate one for zone valves, so the kit may not apply. |
When to stop and call a technician
Put the screwdriver down and book a visit if any of these apply:
- The board shows scorch marks, or you smell something burnt.
- The fuse blows again after you replace it.
- The cable has fewer wires than the kit requires.
- Your home is heated by a boiler, or the system is a heat pump and no kit lists it.
- The screen stays blank or keeps rebooting after you have rechecked every wire against the diagram.
- Working inside a furnace panel is not something you want to do
Wrapping up your C-wire fix
Start by looking for a spare wire, because that costs nothing. If there is none, confirm your system is low voltage, pick the c-wire adapter for your thermostat that its maker supports, follow its diagram at the furnace and thermostat, and test every mode. A photo from before you started makes any mistake easy to undo.
If your cable is too thin for a kit, or you would rather not work inside a furnace, hand it off. You can book a smart thermostat installation with Modern HVAC Tech in Chicago or the north suburbs, and we offer transparent, upfront pricing.
También puede encontrar la versión resumida en o Pines de Pinterest.
Lee otros blogs en nuestra Blogger , Reddit y Página mediana también.
Mostly yes. Makers use different names, such as power adapter or power extender kit, for a device that lets your existing wires carry constant 24-volt power. Use the one your thermostat's maker supports, because the wiring details differ by brand.
Many homeowners finish a c-wire adapter for a smart thermostat install in under an hour once the wiring is photographed and labeled, though a cramped furnace panel or an unclear diagram can stretch that.